Pixera v.1
There are basically two ways of integration: fully integrated calibration or stand alone calibration with calibration file transfer.
Fully Integrated calibration: "Pixera Autocal"
In this mode, everything regarding screen setup, device management and calibration file processing is handled by Pixera . It utilized a special build of VIOSO Integrate that is bundled with Pixera . It's called "Pixera Autocal" and is part of the PIXERA installer, thus available for every installation. While in demo mode, all calibrated results will show a watermark. To have the full functionality unlocked, a license for Pixera Autocal is required, which need to be acquired directly from AV Stumpfl.
The advantage of this tight integrations is a continuous workflow. An operator does not need to "leave" the Pixera environment, all parameters regarding screens, projectors, devices, etc. are automatically shared and transferred with Pixera Autocal, as well as the final result for the output processing. It found in the screen properties within the Mapping tab:

There is a comprehensive video tutorial (credits to Holger Walter, https://meen.ae), showing the workflow of handling a stage setup within Pixera and using Pixera Autocal for generating a panoramic softedge projection on the Pixera helpdesk:
https://help.pixera.one/working-with-projectors/1218507-camera-based-calibration
Running Pixera Autocal standalone
There are more complex scenarios, where a more fine-tuned operation is required, than the "one-stop" solution shown above. For such use-cases it is possible to run PIXERA Autocal independed from PIXERA, or use alternative calibration solutions from VIOSO.
Pixera Autocal is licensed by Pixera itself. You need to have a fully licensed Pixera dongle including Autocal license to launch a calibration or load calibration files
How to launch Pixera Autocal Standalone
To launch Pixera Autocal, you need to launch Pixera first. There is no need to load a specific project - simply have Pixera running (using a dongle with an appropriate license for Pixera Autocal or Pixera Autocal Plus)
Make sure to have no output running by Pixera.
Now you can navigate to the Pixera installation folder and run Pixera Autocal from there.
Pixera Autocal executables are located within the program folder of the Pixera install: [pixera install folder]\vioso\autocal\SPAutoCal64.exe

Launching Pixera Autocal fails
This window pops up, if Pixera Autocal is launchen without having Pixera running:

In this case, launch Pixera (no need to start a specific project) and then launch Pixera Autocal again.
Handling Master-Client systems
Pixera launches VIOSO for single client use only. To enable multiple clients, the projectors of all connected clients must be virtualized on the master PC. This is done by creating a so called "Abstract Display" configuration.
Read here how to configure this:
Multiclient Configuration (Abstract Displays)
Transfer the result back to Pixera (single client)
The transfer to Pixera consists of two actions:
1. Exporting as VWF File
After the calibration is done, select "File - Export" and select as Export format "VWF format". This creates one *.vwf file in the destination folder you specify in the Export path below.
Click the checkbox "3D" if you calibrated your screen with a UV-map:

2. Loading in Pixera
The functionality to load *.vwf files is found in the screen properties within the Mapping tab:

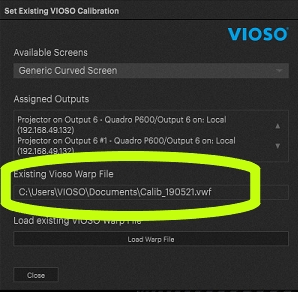
Clicking on load will open the following window including name of selected screen & physical outputs assigned to this screen:

Then, you need to click on the hidden button under "Existing Vioso Warp File" to open the file explorer and select your .vwf file:

Once you see the path written in the box, just press "Load warp file" and your VIOSO calibration will be loaded inside your screen inside Pixera.
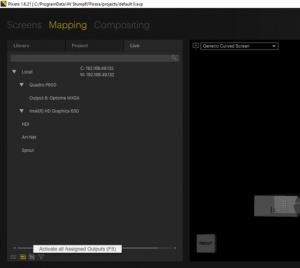
You are now free to activate/deactivate that calibration in the mapping tab of Pixera (shortcut is F5) :

Transfer VWF on multi client configurations
Depending your system configuration, the way to load .vwf exported files will be different. Pixera 1 expects all calibrations present on the computer acting a master and one calibration on each client, residing in the same drive path and naming.
Case #1: Multiple clients with dedicated director PC
You have multiple clients, and your director server does not playback video: exporting your compound will generate 1 .vwf file per client with name + Client IP.
You must then use the exact same path on Master and clients to store your calibrations (in the following exemple C:\Calib). Each Client need only his .vwf file and the master must have all .vwf files as shown here:

In Pixera, select your screen and load all .vwf files from the master at the same time using multi-select

Here is an exemple of how your .vwf files setup looks like on your network:
Director IP: 10.0.0.1
C:\Calib\ExportPixera.vwf C:\Calib\ExportPixera-10.0.0.10.vwf C:\Calib\ExportPixera-10.0.0.20.vwf C:\Calib\ExportPixera-10.0.0.30.vwf
Client 1 IP: 10.0.0.10
C:\Calib\ExportPixera-10.0.0.10.vwf
Client 2 IP: 10.0.0.20
C:\Calib\ExportPixera-10.0.0.20.vwf
Client 3 IP: 10.0.0.20
C:\Calib\ExportPixera-10.0.0.30.vwf
Case #2: Multiple clients with master also playing video
You have multiple clients, and your master server does playback video: exporting your compound will generate 1 .vwf file per client with name + Client IP and 1 with only original name on master.
You must then use the exact same path on Master and clients to store your calibrations. In addition, you need to store on master it’s own .vwf file + dummy version of the clients .vwf files:

A “Dummy calibration” is an arbitrary file (e.g. an empty text file), that needs to be renamed exactly like a “real” *.VWF file (including the file extension). Upon renaming Windows might display a warning: ignore this warning and proceed (it’s a good indicator that you are doing the right job).
In Pixera, select your screen and load all .vwf files from the master at the same time (Master vwf+dummies):

Here is how your .vwf files setup looks like on your network:
Director IP: 10.0.0.1
C:\Calib\ExportPixera.vwf C:\Calib\ExportPixera-10.0.0.10.vwf (dummy, 0 kb filesize) C:\Calib\ExportPixera-10.0.0.20.vwf (dummy, 0 kb filesize) C:\Calib\ExportPixera-10.0.0.30.vwf (dummy, 0 kb filesize)
Client 1 IP: 10.0.0.10
C:\Calib\ExportPixera-10.0.0.10.vwf
Client 2 IP: 10.0.0.20
C:\Calib\ExportPixera-10.0.0.20.vwf
Client 3 IP: 10.0.0.20
C:\Calib\ExportPixera-10.0.0.30.vwf
Last updated