CK\_W56-4
CK\_W76-4
CK\_W89-4
56,8° x 44,0°
76,0° x 60,8°
89,0° x 73,8°
16,10° x 12,10°
22,10° x 16,70°
31,50° x 23,90°
48,20° x 36,70°
60,00° x 46,90°
79,20° x 63,80°
CK\_WU120-4
CK\_WU135-4
135,0° x 119,0°
110,0° x 94,0°
CK\_T29-4
CK\_T44-4
28,9° x 21,9°
44,7° x 33,9°
CK\_FDN-4
CK\_FDN-4b
CK\_FDQ-4
Fisheye calibration kit
Fisheye calibration kit 1” sensor
HQ Fisheye calibration kit
2/3”
1”
1”
2448 x 2048
2592 x 2048
4508 x 4096
23 fps
20 fps
6 fps
CK\_FDY220-4
CK\_FDY250-4
CK\_FDY280-4
1/1.7”
1/1.7”
1/2.3”
4024 x 3036
4024 x 3036
3840×2748
9 pfs
9 fps
10 fps
365,00° x 220,00°
365,00° x 250,00°
365,00° x 280,00°
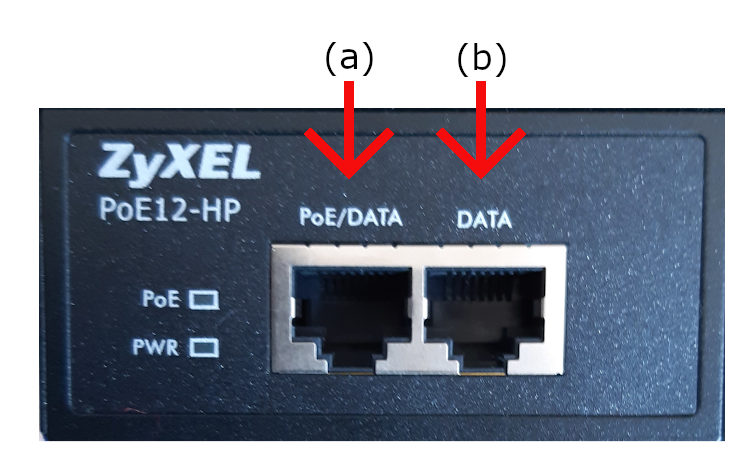 **(a) PoE (Power Over Ethernet)/DATA:**\
Connect the camera to this socket (this will power the camera and a small light will flicker).
**(b) DATA:**\
Connect the Ethernet cable to the PC/server or to a switch.
{% hint style="info" %}
The camera requires a stable 1Gb/s ethernet connection. 100MB/s won’t work!
{% endhint %}
{% hint style="info" %}
We strongly recommend running the camera directly to the PC. Therefore, VIOSO servers usually come with 2 dedicated Ethernet ports. Please note that during calibration the camera creates a large amount of data, occupying the whole network bandwidth and therefore should not be shared with other network based applications (e.g. remote access).
{% endhint %}
### 2. Installing the driver package “Galaxy DSK 2”
1. Download: [Galaxy\_Windows\_EN\_32bits-64bits\_2.0.2309.9181.exe](https://download.vioso.com/drivers/daheng/Galaxy_Windows_EN_32bits-64bits_2.0.2309.9181.exe)
2. Install driver:\
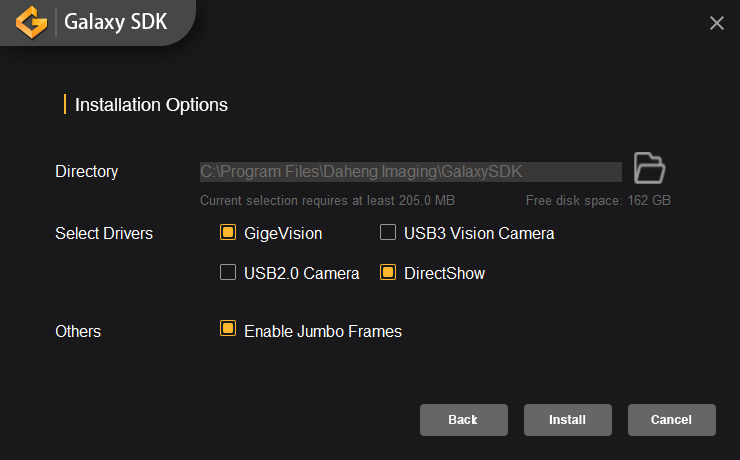
* Check GigE Vision
* Check DirectShow
* Check Enable Jumbo Frames
3. Reboot the system.
### 3. Network configuration
1. Make sure that the camera is connected and powered (PowerLED “blue”)
2. Run the application “GxGigEIPConfig”.\

* If the camera is connected, it shows within the “GigE” tree under the network adapter.
* If the network adapter is not active, the camera gets an address starting with “169.254…”. In this case it is required to reconfigure the network interface to a static IP. Right-Click the network adaptor and select “Network card configuration tool”:\

* Click the Button “Netcard Protocol Property” to access the Windows network settings. Change to static IP setting and enter an appropriate IP (e.g. 10.0.0.1 / 255.0.0.0 for a point-to-point connection). If the network already is set to a fixed IP, you can skip this step.\
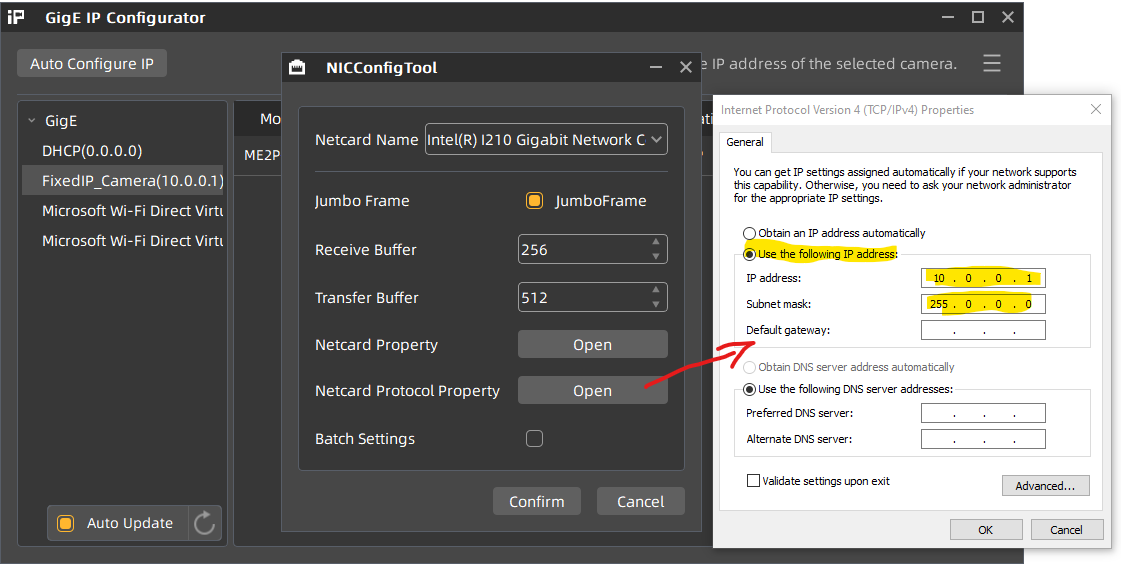\
Terminate everything with “OK” and “Apply”.
* The camera can be configured by clicking “Auto Configure IP”.\

* After this, the camera gets a fixed IP and is marked as available.
* Optional:\
Right-Click on the camera name and open the “Modify IP Address” dialog. Enter an IP of your choice that fits to the IP range entered for this ethernet connection (e.g. 10.0.0.12 according to the example above). You also can change the device name of the camera.\
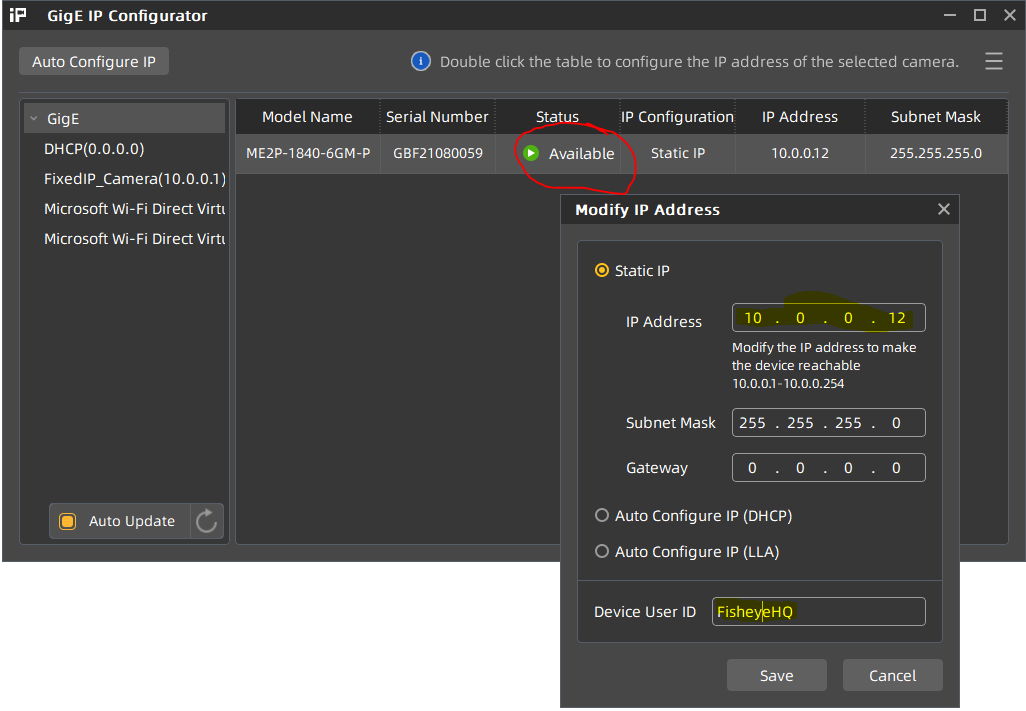
* This way the camera has a fixed IP, that will make all subsequent tasks for calibration more transparent.
## Camera Configuration
All settings of the camera can be done in the “Galaxy Viewer” software.\
\
It is a complex tool, allowing a lot of settings to be made. But we recommend to stick to some very fundamental settings only, leaving as much as possible untreated. All settings that are done by the Galaxy software are temporary, unless you save them as a user set (see below).
Once the camera network configuration is complete, the camera icon gets green (1), indicating that the camera is ready to be operated. Launch the preview by double clicking the camera (1) and press the “Play” Button (2) in the top button bar to display a live camera image.
**(a) PoE (Power Over Ethernet)/DATA:**\
Connect the camera to this socket (this will power the camera and a small light will flicker).
**(b) DATA:**\
Connect the Ethernet cable to the PC/server or to a switch.
{% hint style="info" %}
The camera requires a stable 1Gb/s ethernet connection. 100MB/s won’t work!
{% endhint %}
{% hint style="info" %}
We strongly recommend running the camera directly to the PC. Therefore, VIOSO servers usually come with 2 dedicated Ethernet ports. Please note that during calibration the camera creates a large amount of data, occupying the whole network bandwidth and therefore should not be shared with other network based applications (e.g. remote access).
{% endhint %}
### 2. Installing the driver package “Galaxy DSK 2”
1. Download: [Galaxy\_Windows\_EN\_32bits-64bits\_2.0.2309.9181.exe](https://download.vioso.com/drivers/daheng/Galaxy_Windows_EN_32bits-64bits_2.0.2309.9181.exe)
2. Install driver:\

* Check GigE Vision
* Check DirectShow
* Check Enable Jumbo Frames
3. Reboot the system.
### 3. Network configuration
1. Make sure that the camera is connected and powered (PowerLED “blue”)
2. Run the application “GxGigEIPConfig”.\

* If the camera is connected, it shows within the “GigE” tree under the network adapter.
* If the network adapter is not active, the camera gets an address starting with “169.254…”. In this case it is required to reconfigure the network interface to a static IP. Right-Click the network adaptor and select “Network card configuration tool”:\

* Click the Button “Netcard Protocol Property” to access the Windows network settings. Change to static IP setting and enter an appropriate IP (e.g. 10.0.0.1 / 255.0.0.0 for a point-to-point connection). If the network already is set to a fixed IP, you can skip this step.\
\
Terminate everything with “OK” and “Apply”.
* The camera can be configured by clicking “Auto Configure IP”.\

* After this, the camera gets a fixed IP and is marked as available.
* Optional:\
Right-Click on the camera name and open the “Modify IP Address” dialog. Enter an IP of your choice that fits to the IP range entered for this ethernet connection (e.g. 10.0.0.12 according to the example above). You also can change the device name of the camera.\

* This way the camera has a fixed IP, that will make all subsequent tasks for calibration more transparent.
## Camera Configuration
All settings of the camera can be done in the “Galaxy Viewer” software.\
\
It is a complex tool, allowing a lot of settings to be made. But we recommend to stick to some very fundamental settings only, leaving as much as possible untreated. All settings that are done by the Galaxy software are temporary, unless you save them as a user set (see below).
Once the camera network configuration is complete, the camera icon gets green (1), indicating that the camera is ready to be operated. Launch the preview by double clicking the camera (1) and press the “Play” Button (2) in the top button bar to display a live camera image.
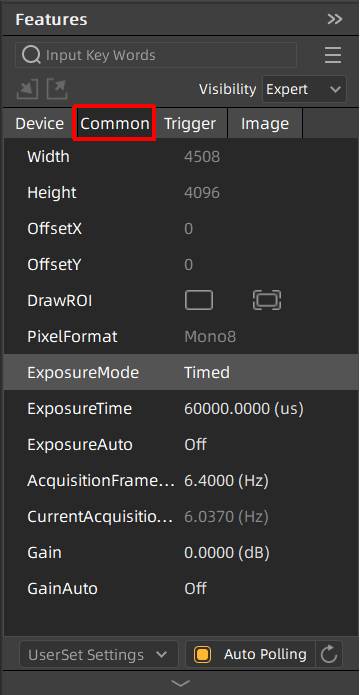 * **Exposure mode:** Timed
* **Exposure Auto:** always set to OFF!\
**Exposure time:** Set to a value that matches with the brightness of the filmed scene. By setting the exposure, the framerate automatically adapts accordingly. Please evaluate the exposure when projectors are displaying bright content, filling all the projection area.
* **Gain:** Set to 0.000 (dB)\
if the camera image is too dark, you can carefully increase the gain. Try to maintain a high contrast when setting a user defined gamma value.
* **GainAuto:** always set to OFF!
### Analog Control
In good conditions, where the camera get sufficient light, there is no need to make any changes, but in challenging environments, the analog control parameters of the camera can help to increase the sensitivity of the sensor. We recommend to leave these parameters unchanged as long as possible. If optimizations are required, start changing the **Blacklevel** parameters, then the **Gamma** parameters and use the **Gain** parameter only as a last resort.
Select the “Device” Tab and expand “Analog Control”:
* **Exposure mode:** Timed
* **Exposure Auto:** always set to OFF!\
**Exposure time:** Set to a value that matches with the brightness of the filmed scene. By setting the exposure, the framerate automatically adapts accordingly. Please evaluate the exposure when projectors are displaying bright content, filling all the projection area.
* **Gain:** Set to 0.000 (dB)\
if the camera image is too dark, you can carefully increase the gain. Try to maintain a high contrast when setting a user defined gamma value.
* **GainAuto:** always set to OFF!
### Analog Control
In good conditions, where the camera get sufficient light, there is no need to make any changes, but in challenging environments, the analog control parameters of the camera can help to increase the sensitivity of the sensor. We recommend to leave these parameters unchanged as long as possible. If optimizations are required, start changing the **Blacklevel** parameters, then the **Gamma** parameters and use the **Gain** parameter only as a last resort.
Select the “Device” Tab and expand “Analog Control”:
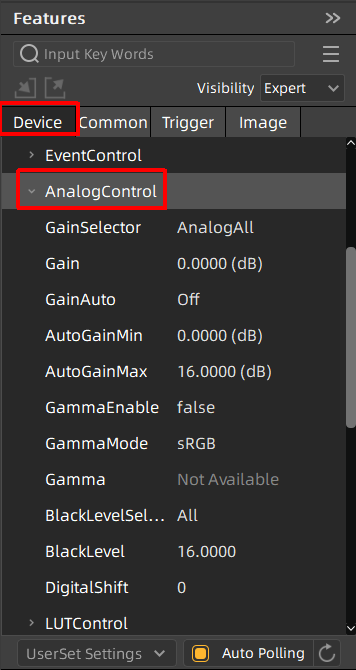 * **Gain:** if the camera image is too dark, you can carefully increase the gain. Try to maintain a high contrast when setting a user defined gamma value.
* **GainAuto:** always set to OFF! Therefore, the values AutoGain are not used
* **GammaEnable:** this will enable the camera sensor gamma behaviour which results in a different sensitivity. Enable only if it is really hard to get a proper projector pattern detection and choose **GammaMode=SRGB**
* **Gamma:** Once enabled you can set the gamma value here.
* **Blacklevel:** This is a good parameter to have the projector patterns displayed properly while “hiding” darker parts. Start optimizing the camera behaviour by changing this value first, before trying Gain or Gamma.
### Image cropping for Fisheye calibration kits
fisheye lenses produce a sqare image, but the sensors aren’t square. For the use of 3D features in VIOSO (“MRD”), it is important to set the camera to a square pixel resolution. Therefore, a custom resolution based on the sensor height resolution should be set according to the sensor height resolution and with an offset to match the lens at the center.
1. To change the sensor resolution, STOP the current camera stream (1)
2. Set the parameters “Width” and “OffsetX” to get a square resolution, centered on the sensor (2) – see table below:
* **Gain:** if the camera image is too dark, you can carefully increase the gain. Try to maintain a high contrast when setting a user defined gamma value.
* **GainAuto:** always set to OFF! Therefore, the values AutoGain are not used
* **GammaEnable:** this will enable the camera sensor gamma behaviour which results in a different sensitivity. Enable only if it is really hard to get a proper projector pattern detection and choose **GammaMode=SRGB**
* **Gamma:** Once enabled you can set the gamma value here.
* **Blacklevel:** This is a good parameter to have the projector patterns displayed properly while “hiding” darker parts. Start optimizing the camera behaviour by changing this value first, before trying Gain or Gamma.
### Image cropping for Fisheye calibration kits
fisheye lenses produce a sqare image, but the sensors aren’t square. For the use of 3D features in VIOSO (“MRD”), it is important to set the camera to a square pixel resolution. Therefore, a custom resolution based on the sensor height resolution should be set according to the sensor height resolution and with an offset to match the lens at the center.
1. To change the sensor resolution, STOP the current camera stream (1)
2. Set the parameters “Width” and “OffsetX” to get a square resolution, centered on the sensor (2) – see table below: