> For the complete documentation index, see [llms.txt](https://docs.vioso.com/llms.txt). Markdown versions of documentation pages are available by appending `.md` to page URLs; this page is available as [Markdown](https://docs.vioso.com/preparation/camera/vioso-camera-kits/configuring-ids-imaging-cameras.md).
# Configuring IDS Imaging Cameras
Legacy VIOSO Calibration comes with the camera body, a suitable lens, and a PoE-Injector for running the camera on any switch or directly from the PC/server.
## Overview about Calibration kits based on IDS cameras:
The following instructions apply to camera kits with a body from “IDS Imaging”:
| Calibration Kit | Description | Camera Body | Interface | Sensor size | Resolution | Lens |
| --------------- | -------------------------------- | ----------- | --------- | ----------- | ----------- | ---------------------------------------------- |
| CK\_FDU | Fulldome Calibration Kit USB | IDS uEye CP | USB 3.1 | 2/3” | 1920 x 1200 | 360° x 185° fisheye |
| CK\_FDY280 | Hyperfisheye Calibration Kit USB | IDS uEye CP | USB 3.1 | 1/2.3” | 4912 x 3684 | 360° x 280° fisheye |
| CK\_WQ95/XX | Super HQ Calibration Kit | IDS uEye CP | GigE | 1.1” | 4104 x 3006 |
95,70° x 78,70° … 16,10° x 12,10°
|
## Installing
### 1. Connecting the camera
Mount the camera and connect camera to PoE injector and the PoE injector to the network and power.
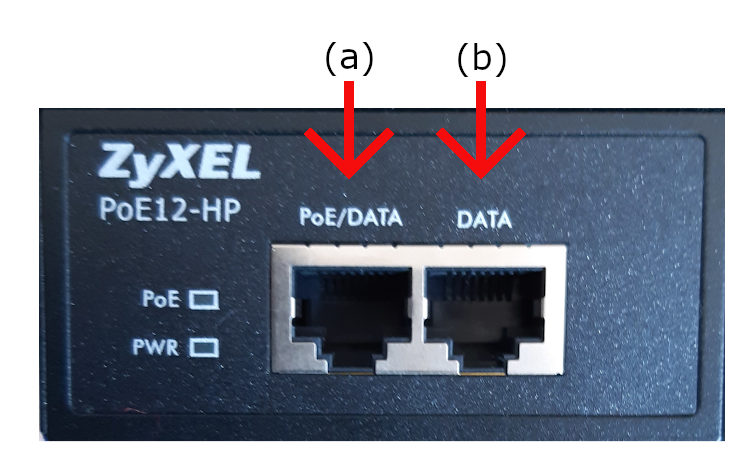
**(a) PoE (Power Over Ethernet)/DATA:**\
Connect the camera to this socket (this will power the camera and a small light will flicker).
**(b) DATA:**\
Connect the Ethernet cable to the PC/server or to a switch.
{% hint style="info" %}
The camera requires a stable 1Gb/s ethernet connection. 100MB/s won’t work!
{% endhint %}
{% hint style="info" %}
We strongly recommend running the camera directly to the PC. Therefore, VIOSO servers usually come with 2 dedicated Ethernet ports. Please note that during calibration the camera creates a large amount of data, occupying the whole network bandwidth and therefore should not be shared with other network based applications (e.g. remote access).
{% endhint %}
### 2. Install IDS U-Eye Software
1. Download: [uEye 49610.zip](https://download.vioso.com/drivers/ids/uEye%2049610.zip)
2. Install driver
### 3. Network configuration
After installing and rebooting, you will be able to use the **IDS Camera Manager to co**ntrol the basic network settings of the camera.
#### IDS camera manager main window
If you see a yellow icon on the top of your window next to your camera, there has been an error (The error warning will be in red on the bottom of the window).
There are several warnings that can show up due to IP addresses being wrongly set, or relating to the camera’s firmware.
#### Configuring the camera for first use
#### Set a fixed IP
Before proceeding to configure the camera, make sure that the network interface is set to a fixed IP. Locate & open the IDS Camera Manager application (it can be found in: C:\ProgramData\Microsoft\Windows\Start Menu\Programs\IDS).
Learn here how to set a fixed IP in Windows:
#### Configure your camera
1. Run IDS Camera Manager.
2. Select the NIC that is connected to the same network as the PoE camera.
3. Select the camera from the Camera list.
4. Select Automatic ETH Configuration.
5. Close the software.
Your camera should be working correctly and the window must no longer show an error message. The main window should look like this:
## Testing the camera
To test the camera, use the application “uEye Cockpit”.

Choose the mode "Live video":
### uEye cockpit main window
#### Display the camera stream within uEye Cockpit
1. Click on the play icon with the camera in the top-right corner (under the”File”menu).
2. Note that the image may be rotated 180 degrees if the camera is mounted “upside down”, which can be fixed by clicking on the wrench icon, selecting the Size tab, and mirroring the left/right and up/down under the “Format” section.
3. Adjust the zoom and iris settings by loosening the screw locks counter-/anti-clockwise, positioning.
4. Then appropriately using the camera feed for preview and tightening to lock them into place.
5. Close all windows when testing is complete.
 **(a) PoE (Power Over Ethernet)/DATA:**\
Connect the camera to this socket (this will power the camera and a small light will flicker).
**(b) DATA:**\
Connect the Ethernet cable to the PC/server or to a switch.
{% hint style="info" %}
The camera requires a stable 1Gb/s ethernet connection. 100MB/s won’t work!
{% endhint %}
{% hint style="info" %}
We strongly recommend running the camera directly to the PC. Therefore, VIOSO servers usually come with 2 dedicated Ethernet ports. Please note that during calibration the camera creates a large amount of data, occupying the whole network bandwidth and therefore should not be shared with other network based applications (e.g. remote access).
{% endhint %}
### 2. Install IDS U-Eye Software
1. Download: [uEye 49610.zip](https://download.vioso.com/drivers/ids/uEye%2049610.zip)
2. Install driver
### 3. Network configuration
After installing and rebooting, you will be able to use the **IDS Camera Manager to co**ntrol the basic network settings of the camera.
**(a) PoE (Power Over Ethernet)/DATA:**\
Connect the camera to this socket (this will power the camera and a small light will flicker).
**(b) DATA:**\
Connect the Ethernet cable to the PC/server or to a switch.
{% hint style="info" %}
The camera requires a stable 1Gb/s ethernet connection. 100MB/s won’t work!
{% endhint %}
{% hint style="info" %}
We strongly recommend running the camera directly to the PC. Therefore, VIOSO servers usually come with 2 dedicated Ethernet ports. Please note that during calibration the camera creates a large amount of data, occupying the whole network bandwidth and therefore should not be shared with other network based applications (e.g. remote access).
{% endhint %}
### 2. Install IDS U-Eye Software
1. Download: [uEye 49610.zip](https://download.vioso.com/drivers/ids/uEye%2049610.zip)
2. Install driver
### 3. Network configuration
After installing and rebooting, you will be able to use the **IDS Camera Manager to co**ntrol the basic network settings of the camera.
 #### IDS camera manager main window
If you see a yellow icon on the top of your window next to your camera, there has been an error (The error warning will be in red on the bottom of the window).
#### IDS camera manager main window
If you see a yellow icon on the top of your window next to your camera, there has been an error (The error warning will be in red on the bottom of the window).
 ### uEye cockpit main window