> For the complete documentation index, see [llms.txt](https://docs.vioso.com/llms.txt). Markdown versions of documentation pages are available by appending `.md` to page URLs; this page is available as [Markdown](https://docs.vioso.com/integration/integrated-videoplayer.md).
# Integrated Videoplayer
The integrated player serves as a source for your test images when editing the calibration.\
However, it can also be used for basic tasks such as found fixed installations trade shows or spontaneous presentations.
## Supported media files
The Player of VIOSO 6 is built on top of the widely used FFMPEG library and therefore is capable of processing a vast amount of video and audio codecs. To get a full list of supported codecs and containers, please take a look at the comprehensive [Wiki-Page of the FFMPEG project](https://en.wikipedia.org/wiki/FFmpeg).
Here is an overview of the most commonly supported video formats:
| **Codecs** | **Container** |
| ----------------------------------------------------------------------------------------------------------------------------------------------------------------------------------------------------------------------------------------------------------------------------------------------- | ------------------------------------------------------------------------------------------------------------------------------------------------------------------------------------------------------------------------------------------------------------------------------------------------------------------------------------------------------ |
|
|
{% hint style="info" %}
For a full list of supported codecs and containers, either visit this [Wiki page](https://en.wikipedia.org/wiki/FFmpeg) or the [codec section](https://www.ffmpeg.org/ffmpeg-codecs.html) of the FFMPEG documentation.
{% endhint %}
Next to the playback of media files, the VIOSO player also supports display of live inputs:
* Direct Show sources
* NDI sources
## Usage for video playback
To run the player a calibration (display compound) must exist. Select the compound you want to play back content onto and `Activate` the output. Then click `Player`:
### Playlist Features
The player consists of a single playlist that holds a number of placback items. All functions of the Player are available via buttons on the playlist.
#### Top Row
1. **Add entry:** Add a media file, control item, or image sequence to the playlist (add entry menu explained below).
2. **Delete entry:** Delete the selected entry from the playlist.
3. **Delete all entries:** Delete the entire playlist.
4. **Re-order entries UP:** Re-order the selected media item one place higher on the playlist.
5. **Re-order entries ALL UP:** Re-order the selected media item all the way up the playlist.
6. **Re-order entries DOWN:** Re-order the selected media item one place lower on the playlist.
7. **Re-order entries ALL DOWN:** Re-order the selected media item all the way down the playlist.
8. **Load a playlist:** Select playlist from disk.
9. **Save a playlist:** Save playlist on your disk.
10. **Dock to Main Window:** Dock the playlist window on the left side of the main window.
#### Bottom row
1. **Video progress:** Progress bar for video files.
2. **Previous item:** Go back to previous media file.
3. **Play:** Play selected item.
4. **Next item:** Go to the next media file on the playlist.
5. **Pause:** Pause current playback.
6. **Stop:** Stop current playback.
7. **Autoplay:**, when checked, the playlist starts playing as soon as the output is activated (important for autostart scenarios)
8. **Default image duration (infinite):** Set the duration of all images on the playlist. If the infinite box is checked, the selected image will last indefinitely and will only be changed manually.
9. **Status information screen:** Displays the current playback status.
10. **Volume control:** Manage the global audio volume of the current playback.
#### Adding Entry menu
Use the `Add` Button to add items to the playlist:
1. **Add media file:** Add one or multiple media files from disk
2. **Add image sequence:** Open the parameter window to import a sequence of images:
* **Enable:** Activate or deactivate the image sequence.
* **Path:** Click `Select` to choose a folder to import — all the recognized image files on the folder will be imported.
* **Mask:** Write the name of a mask you want to import.
* **Sorting:** Choose from the drop-down menu the way images will be placed on the playlist (unspecific, ascend, or descend order).
* **Frame time:** Select how long the images will be on screen (all images).
* **Duration: Loop (check box):** If checked, the image sequence will play on loop.
Click ‘Ok’ to import the image sequence or ‘Cancel’ to abort.
3\. **Add control item**
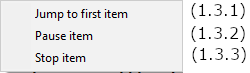
**1.3.1. Jump to first item:** Adds a contonl item that executes a jump to the first item on the playlist.
**1.3.2. Pause item:** Adds a contonl item that makes the playlist pause at this item.
**1.3.3. Stop item:** Adds a contonl item that stops the playlist and will start from the first item.
4. **Add model item:** Add an MRD item (Model Render Display) to use for 3D Mapping
### Media Item Options
Ricght-click a playlist item to access the context menu with options for this media item:
#### Properties:
**Tab "Parameter"**
Main parameters for displaying the current media item:
* **Enable (check box):** Activate or deactivate the selected media file.
* **Audio stream:** Select the audio stream to play along with the video.
* **Audio level:** Select the desired volume level for the selected audio stream.
* **Mute (check box):** If checked, the video will play without audio.
* **Video engine:** Select the desired video engine to decode the video.
* **Start:** Sets the in-point of the video (changing currently possible).
* **Duration:** Duration of the video (changing currently possible).
* **Loop (check box):** If checked, the video will play as an endless loop.
**Tab "General"**
Comprehensive metadata of the current media item:
**Tab "Preview"**
Displays a sample frame for the current media item as preview.
**Tab "Codec"**
Runs a detailled analysis of the media item contents and presents a list of media parameters:
## Usage for Live-Input
VIOSO can be used to display live input sources on a calibrated output.
{% hint style="info" %}
Live Input display is only possible in Free Mode
{% endhint %}
Activate the output and click `Live Input` to open the list of available input sources:
Select the live source from the list in the above part of the dialog. As soon as the source is active, it’s contents are displayed on the target selected from the main windows and the options of this source are active. There are two kinds of sources available:
1. **DirectShow:** These generic sources are provided by the Microsoft DirectShow driver, which support a wide range of input devices. Typically USB devices like webcams come with DirectShow, but also capturing devices and other sources that provide their stream via DirectShow. Please note, that all settings of a DirectShow device are provided by its driver and piped through VIOSO "as is", so there is no way for VIOSO to alter or influence the appearance of such parameters.
2. **NDI**: Requires “NDI Tools (r)” installed – read below
{% hint style="info" %}
To switch between sources, the playback has to be stopped, so toggle the Show mode to “Off” before switching to another source.
{% endhint %}
### Using NDI
VIOSO provides native support to display NDI streams. For this to work, you need to install the free “NDI Tools (r)” software package: .
After installing, restart VIOSO and NDI sources will show up as configured and available:
## Autostart and Autoplay
Properly configured, VIOSO can serve as a persistent playback engine that starts with Windows, loads a specific calibration and playlist and runs this playlist unattended.
To achieve this, Autoplay and Autostart are to be configured. Their configuration differs a bit between Free Mode and Project Mode.
### Autostart
First, make sure VIOSO is launched with Windows Startup. Read more here: [First Init & Autostart](/preparation/deployment/first-init-and-autostart.md#autostart)
### Project Mode
A dedicated profile for performing a calibration and run content with the integrated player exsists:
Create a new project, choose the profile `Video Playback`, provide a name, the project file saving location and click `Create`.
Create the project design (projectors, camera, etc.).
Select the node "Activate Parameter" and check the box `Apply On Startup`:
Proceed with the calibration.
When reacing the `Activate` step, select the calibration as target and activate the output, then click `Player`:
Check the box `AutoPlay`.
Populate the Playlist. For an infinite playback:
* Either set one item of the playlist to infinite duration - the playlist will run only this item until stopped otherwise.
* Or add a the control item `Jump to first item` to have the playlist looped from first entry to the jump entry until stopped otherwise.
In project mode, the last used project is automatically loaded when launching VIOSO. Therefore, make sure that the project containing the Video Playback configuration is opened before terminating VIOSO.
If so, at next Windows startup, VIOSO is launched (=> VIOSO's global `Autostart setting`), and due to the `Activate Parameter` in the project design as well as the `Auto Play` checkbox in the playlist the playback of the content is initiated.
### Free Mode
In Free Mode, as there is no automatic loading of the last used project, there is a special setting to achive the same behaviour as in project mode.
First, run through the calibration, populate the playlist or set up the live input, check `Autoplay` in the Playlist and activate the playback.
{% hint style="info" %}
Make sure to have the playback active and running. Only then contine.
{% endhint %}
After everything is set up this way and **while the content is running**, access `Menu > File > Activate Autoloading on Startup` :
After accessing, a confirmation dialog shows that the procedure is completed: a copy of the current VIOSO calibration file is made, named \_Startup.sps.
At every startup, VIOSO now automatically loads \_Startup.sps and performs every action that is configured in this file (calibration, playback or live input, autoplay).
To deactivate this behaviour, access `Menu > File > Activate Autoloading on Startup` and the `_Startup.sps` file is removed.
 **1.3.1. Jump to first item:** Adds a contonl item that executes a jump to the first item on the playlist.
**1.3.2. Pause item:** Adds a contonl item that makes the playlist pause at this item.
**1.3.3. Stop item:** Adds a contonl item that stops the playlist and will start from the first item.
4. **Add model item:** Add an MRD item (Model Render Display) to use for 3D Mapping
### Media Item Options
Ricght-click a playlist item to access the context menu with options for this media item:
**1.3.1. Jump to first item:** Adds a contonl item that executes a jump to the first item on the playlist.
**1.3.2. Pause item:** Adds a contonl item that makes the playlist pause at this item.
**1.3.3. Stop item:** Adds a contonl item that stops the playlist and will start from the first item.
4. **Add model item:** Add an MRD item (Model Render Display) to use for 3D Mapping
### Media Item Options
Ricght-click a playlist item to access the context menu with options for this media item: