> For the complete documentation index, see [llms.txt](https://docs.vioso.com/llms.txt). Markdown versions of documentation pages are available by appending `.md` to page URLs; this page is available as [Markdown](https://docs.vioso.com/start/testpattern.md).
# Testpattern
## Considerations for creating a Testpattern
Before doing any calibration, it is important to have a test pattern that fits to the aspect ratio and geometry of the screen. Follow these steps to to create an appropriate test pattern. Testpatterns are used in numerous subsequent steps during the calibration process:
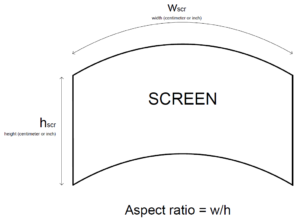
1. Determine the screen dimensions and aspect ratio of the content\
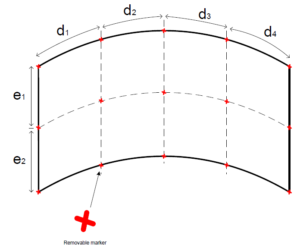
2. Make sure your projectors overlap equally for an optimal calibration result. Then put removable markers on the screen. Make markers the same size horizontally and vertically.\
d1 = d2 = d3 = d4 ...\
e1 = e2 ...\
3. Create a test pattern using our[ free Test Pattern Generator](http://testpatterngenerator.com).
## Online Testpatterngenerator
To get an optimal result for your calibration, we highly recommend making a test pattern the size of your screen or projection surface. To create a test pattern, you need:
* The measurements of your screen or projection surface and the screen aspect ratio
* The size of your display (if you are not sure about your display size, make an estimate).
{% hint style="info" %}
VIOSO's free testpattern generator is available at:
[**http://testpatterngenerator.com**](http://testpatterngenerator.com)
{% endhint %}
### Features
This multi-display/edge blending pattern generator will provide you with customized panorama/softedge PNG high resolution images. This allows for an accurate projection alignment on site and also helps you calculate the overlap on the blending zones.
**Note on projector overlaps:**\
A suitable projector overlap depends on various parameters. As a rule of thumb, consider overlaps not lower than 10% of each projector’s image. An overlap greater than 25% should be avoided, since too many pixels and too much brightness are lost with such large overlaps.
The image at the top of the screen represents your test pattern. By adding values to the fields below and clicking the refresh button  by the side of the value, your pattern preview will be updated and change according to the data you entered. If the value does not have a refresh button next to it, the test pattern preview will automatically be updated, showing the changes on screen.
A test image should consist of a regular pattern that you can measure or match with the surface. Horizontal and vertical lines aid to align the projection with the help of additional markers or laser beams. Squares and circles are good to determine the correct geometric mapping, as long as the aspect ratio of the test image matches with the aspect ratio of the screen.
### Step-by-step guide
In this section, we will walk through a step-by-step explanation on how to use the test pattern generator.
* [ ] **Step 1:** Name your test pattern.
* [ ] **Step 2:** Insert the size of your display.
* [ ] **Step 3:** Select the number of displays you are working with.
* [ ] **Step 4:** Define the overlap of your projectors. The overlap will only be shown on the preview image if you have the overlap option activated.\

* [ ] **Step 5:** Define the grid size of your pattern.
* [ ] **Step 6:** Define the color of your grid and text.
* [ ] **Step 7:** There are multiple options to customize your pattern. Click on the switch buttons to add circles, hatching (texture on the background), a color bar, or to invert the color of your pattern (this will make the background of the pattern white).
* [ ] **Step 8 (optional):** To add a logo, click on the ‘Choose a file’ button and select the image you want to use. If you have the logo button switched “ON” it will automatically appear in the center of the image. If you want your logo not to appear on screen, you can switch the button off. When deactivated, the logo will still be there it will just not be visible.
* [ ] **Step 9 (optional):** If you have added a logo, glide the nob on the slider to make your logo bigger or smaller.
* [ ] **Step 10:** Once you are satisfied with your test pattern, click the ‘Save image’ button and a PNG high resolution image will be saved to your computer with the name you selected (in some cases this will be done automatically, check your downloads folder).
Your test pattern is ready to use!
To make a new pattern, just load the new values on the generator or refresh the page if you wish to have the automatic settings back.
If a value that you added is too large or is not compatible with another measurement that you have entered, the preview of your test pattern will disappear.
To correct this, just change the values or refresh the page.
### Prerendered Testpatterns for dome projection
At the bottom of the page, you will find test patterns for domes and cylinders available for download.